Snowmobile Fanatics banner

Ice Fishing Sled Build - '96 Indy 500

23K views 24 replies 7 participants last post by  ReelDeal  
#1 ·
Since my wife won't let me get tracks for my wheeler or a new sled I decided to rip apart my 1996 Indy 500 and make her into an ice fishing beast. In the past 4 years I think I've been trail riding once - I almost exclusively use this sled for ice fishing and I don't think the stock setup is meant to pull a 300lb portable with two 230lb guys on it.

As of now, here's what I'm planning on doing:

  1. Drop the skid for a little more clearance. I've run into the problem where I get into deep snow or slush and bottom the sled out before my track can dig down to the ice where the studs can grab.
  2. Put stiffer springs in the skid or move the tension adjustment rollers up - again, needs to support almost 500lbs without bottoming out.
  3. Gearing down to a 17T top sprocket and a 41T bottom sprocket. I know that seems pretty steep but I'm not building a race sled, I'm going for a snow tractor. I don't need to go 90mph, 30mph and lots of torque is just fine by me.
  4. Raise the front end somehow if needed after I drop the skid.
  5. Build a rack for the back with a hitch and an auger rack for the front.
  6. Lots of general maintenance since I don't think it has been done for quite some time - clean carbs, grease and clean the skid, clean the clutches and new springs, new fuel, oil, and air lines along with filters.

Although I am a mechanical engineer by profession and have been fixing all sorts of machines since I was young, I'm still pretty new to working on snowmobiles. If you have any thoughts or or ideas on what I am trying to do please feel free to let me know so I don't screw anything up.


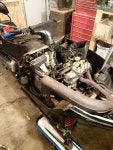
Starting the tare-down. Lots of penetrating oil used. The steering post was rusted up, I took it out and heated it up and it still wouldn't move - time for a new one.


Spring tension roller location before.


Spring tension roller location after the new bracket was installed. If this doesn't work out I can always take the bracket off, move it back to the original location, and get bigger springs. I had the aluminum laying around so I thought I would give it a try.
 
#3 ·
Good idea. I've thought about that a little bit but I'm still not quiet sure how to go about it.

1. Basically raise the hole location on the skis with brackets including something for the rubber stop to rest on. I think this would be the easiest and cheapest. My only concern with raising the pivot point is you create a larger moment arm and in turn create a little more downward pressure on the front of the ski which could cause it to dive in the snow more.

2. Find or make longer spindles. I have the capability to weld just about anything but the only machining capabilities I have is a grinder and drill press. Having a shop make them would probably cost more than the sled is worth. If I recall, the Edge suspension has longer spindles but I don't know what else would be required to make them fit in my sled.

Maybe if I go with the brackets and position the rubber stop so the skis can't rotate too far forward I would be ok.

Has anyone else done this before?
 
#4 · (Edited)
im not sure the aluminum block will take the banging unless you strictly use it on the lake..... with that gear ratio it may trench and end up worse than oem gearing.
 
#5 ·

I ran a simulation on the aluminum bracket and each one should handle about 350 lbf*in of torque - basically a combined load of 350lbs to each spring block (700lbs total). Of course we do not live in a perfect world and that was not factoring in any impact loading or spring preload. I shouldn't be pounding on it too hard but I will definitely keep an eye on it the first few times I use it and make sure I have the tools with to take it off if I need to.

What do you mean by "trench"? The good news is I will still have the stock sprockets and chain I can put back in if it is a problem. What ratio would you suggest for a workhorse sled?
 
#6 ·
trench means it will dig a hole with the track. At best if it fits I would drop 2 teeth on top. I use my wifes 98' indy 500 for ice fishing also. I pull about 300 lb in total pluss myself and daughter so about 500 lbs total. Ive dropped thru in slush but never had an issue where I was stcuk. Maybe its time for alittle more lug on the track.
 
#8 ·
The 17/41 gears and a new chain should be showing up in the mail today. As long as I've got everything torn apart I think I will throw those in there and give it a try - worst case scenario it ends up being too much and I put the stock 21/39 gears back in and maybe order 19 for the top.

I've got the front shocks cranked all the way up already and she still sits pretty low. I think you're right with the new springs and I know the shocks need to get rebuilt anyway. New springs and a shock rebuild - I might be better off just getting new ones. I'll start there and make extensions later if I need them.

xcr440: Funny you mention a track with a little more lug. She's got 3/4" of lug left on her that has been beat to heck. The track is starting to get some pretty bad checking in it too - I think the studs are about the only thing that keep it going. It was time for a new track a few years ago. It should make it through this season and next season I would like to get a new track and a 136" skid (or I just tell my wife my bonus was less this year and I go buy it now). And I'm still a little torn on how I want to do that too. I know when I drop my skid I will be making my attack angle worse. That being said, do I go with the 136" skid or do I make/buy some shorter rail extensions for my 121" skid to move it down and back for a better attack angle with the 136" track?
 
#9 ·
go to a 144" more options out there.
 
#11 ·
when you put tunnel extension on. you can build rack right on that part.....
 
  • Like
Reactions: Like2tinker
#13 ·
An idea for ya!!!
 

Attachments

#14 ·
Now that would be the way to go!!! I think the old Indy would collapse if I tried that with my house though - it weigh's 120lbs dry and I do a pretty good job of filling it up with stuff. If I went with that I might need the Bearcat too (which I wouldn't mind one bit either). I think I might take another look at the rack I designed though. Make it a little wider and I think it might need to get a little longer to accommodate the tunnel extension.

I had a little setback this weekend. I got everything done on the engine that I needed to and put back in the sled, fired it up, and gas was shooting out of the carbs. I went back out after dinner and the entire engine was filled with gas (I forgot to shut the gas off too). So I got every drained out, over a quart of gas, and I'll be taking apart the carbs again tonight. I have a feeling I got the wrong needles and seats in the carb kit I got - I noticed they were a little shorter than the original ones. Or both floats were stuck but I'll put the old needles back in and see what happens.

Once I get that figured out the next step will be putting the skid back in. I think I will hold off on the longer track for this year since I've been itching to get out fishing and I don't want to walk 2 miles out to my favorite spot. I'll drill new holes in the front hangers as low as I can and make some drop brackets for the back. I'll check to see how thick the original ones are but I'm thinking 1/8" steel plate coming down from the inside of the tunnel and a 1/8" thick angle bracket under the foot boards. Plug weld or rivet the two together so the skid bolts through 1/4" of material.

Something to that effect anyway.
 
#15 ·
I cleaned up the old needles and threw them back in the carbs - it runs like a brand new machine now. I also put the new gears in, I went with a 18 top and 41 bottom. I threw the skid back in before I had the drop brackets made because I was too excited to take it out for a little test drive. So far everything works flawlessly.

I did get the brackets made and in. I lowered the front 2.5" and the rear 3". I also made another hole at 3.75" in the rear just in case I need to go more. I put the skid back in and made the mistake of not loosening up the track tension beforehand. One of the tension bolts is corroded and froze up - I couldn't even get it to move with 3 days of continious penetrating oil and use of the air impact gun. So it looks like I will be taking the skid out again. If I can't get it to move then I will have to take bracket an bolt off and make or buy a new one. I may end up making one for now since I've got a fishing trip scheduled in two weeks.

I also got the tow arm made for the fish house. It works great! After I got it on I drove around the yard with the wheeler and gave it a good shakedown.

More updates to come. Once I get the track tensioner moving again I'll start on the rack / tunnel extension. After that it should be pretty well complete until next year when I get a longer track.
 
#16 ·
Well, I ended up snapping off the track tensioner bolt and I was feeling a little too impatient to wait around for a new part to arrive - so I made my own. It actually works pretty good. It's just a chunk of 1/4" angle I had laying around cut to size and 3 holes drilled.

After I got that done I found more problems. I've got a few holes that need to get filled in and redrilled - they're pretty ovaled out. Good thing I have a TIG welder.

I threw the skid back in just to see what it looks like and try it out. I also dropped the back all the way down to see what would happen. It kinda looks like a drag car with the back end that high but we'll see what happens when I get another person on there too. I rotated the rear stop blocks around to the highest setting and that also made a bid difference.

And here's a picture of the drop brackets. (I screwed up my angles, that's why the holes are not centered on the bracket but it still works fine.)

Next will be fixing the holes in the skid and making a rack. Depending on how it sits with 2 people on it I may move the skid up a notch and I have a feeling I will also have to make the ski risers.
 
#17 ·
WOW!! get on it too hard and I think skis will be off the ground. Time to find some longer shocks.
 
#19 ·
I had a friend stop by last Wednesday and we both sat on the sled. We're both about the same build and around 220lbs. With both of us on the sled it only squatted down 2"-3"!!! I can jump up and down on the back grab bar and not bottom it out. That being said, I think I can bring the back end down a little and maybe move the spring blocks down to soften up the ride a little - there will probably be quite a bit of trial and error going on until I'm happy with it.

I took the skid out again and got the holes filled in and drilled on the rails where they were bad. I also got a good start on the rack for the back. It looks like I'll be pretty busy at work this week so I'm guessing I won't get the rack done before this weekend (I'll try my best though). Besides putting the skid back in and the rack on, getting longer shocks for the front or making ski risers is the last thing I'll probably do to it this season. Once I get the rack done and on it I'll make sure to put some more pictures.
 
#21 ·
now this is a ice fishing sled

https://www.facebook.com/video.php?v=472524695607


Catch em and cook em
There we go, the complete package - fish house and sled all in one!!!

The rack is starting to look like a rack. I've actually made quite a bit of progress this week despite being busy at work. I just have the bars to weld on one more side and figure out a mount for the back rest.
 
#22 ·
Well, I finally got the rack on the sled and it's definitely big enough. The only thing left to do for this year is move the skid back up a notch so it doesn't sit quite so high and remount the backrest. We'll be testing it out this weekend on Chequamegon Bay!!!
 
#25 ·
We had the sled out a few weekends ago and, for the most part, it worked pretty good. There was plenty of power at low speeds now and there was even some travel left in the suspension with two guys on it. The only problem was with two guys on it there was just about no ski pressure - the skis would come off the ground if you hit the throttle too fast. Having no snow on the lake probably didn't help too much either. So I think for now I will raise the front of the skid up a little to gain a little more ski pressure. Next year I'll get a longer track - I'm guessing that will help the ski pressure issue and just be better all around. Once you get two people on it the machine sits pretty good so I think I will forego the ski risers for now too. All in all, I'm happy how it turned out... but on the other hand, its a snowmobile and there will always be room for improvements.